 |
Products |
 |
|
|
| File Preparation |
|
|
 |
- What type of files can I send to Mind2Print?
- What color mode should my files be?
- What resolution should my file be?
- How should I set up my bleed and crop marks?
- Does Mind2Print accept borders on jobs?
- How should I set up my file for proper rotation?
- How can I avoid transparency issues?
- Can I submit multiple files in one document?
- What is rich black and how can I get it?
- How should I setup my file for Spot UV?
- How do I export a PDF correctly?
- How can I make sure my blues do not come out purple?
- How do I export a grayscale image in a CMYK document?
- What type of files can I send to Mind2Print?
We recommend saving as a .PDF
You may also send the file in the following types: jpg, jpeg, psd, tif, tiff, and eps
We prefer that you send .PDF and .EPS files with outlined fonts. These files are easier to handle and will likely speed up your turn-around. Remember to add crop marks and flatten your files before uploading.
[Back To Top]
- What color mode should my files be?
You should always start and finish your designs in CMYK color mode.If you send us an RGB file, there is a chance that a color shift may occur and you may not be satisfied with your job. 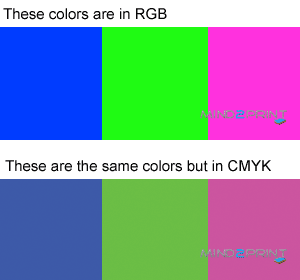
[Back To Top]
- What resolution should my file be?
Images should be 300dpi. 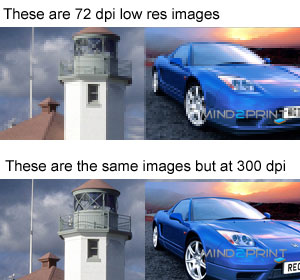
[Back To Top]
- How should I set up my bleed and crop marks?
Bleed must extend further than the cut line. Using one of our Mind2Print Templates can help you visualize this. Please keep all text and anything you do not want cut at least .125" away from the cut line. 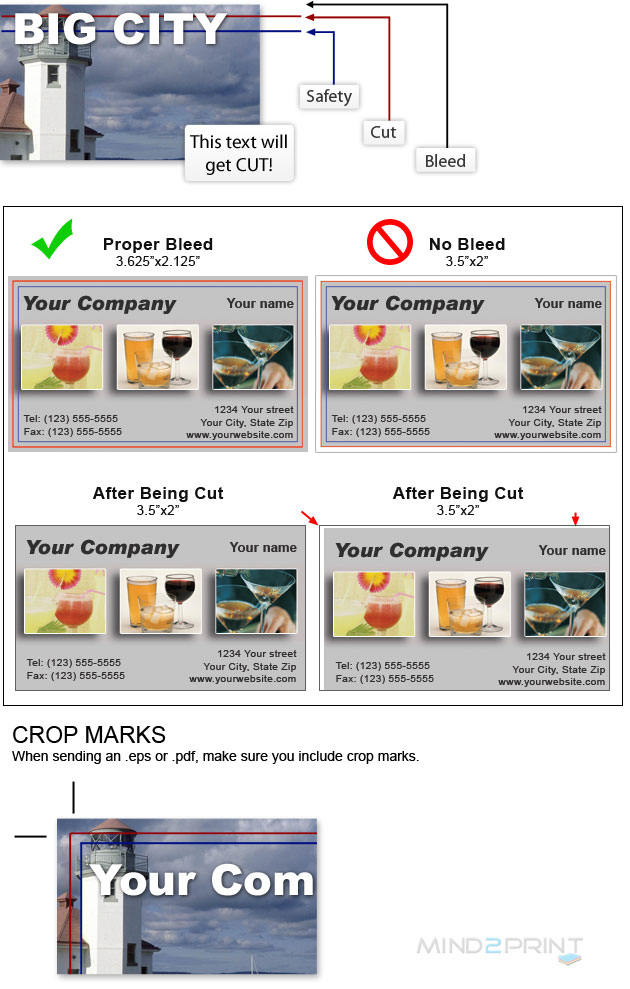
[Back To Top]
- Does Mind2Print accept borders on jobs?
Yes, but if the border is too close to the cut line, it may be cut off-center slightly. A 1/16" margin of error exists when cutting. 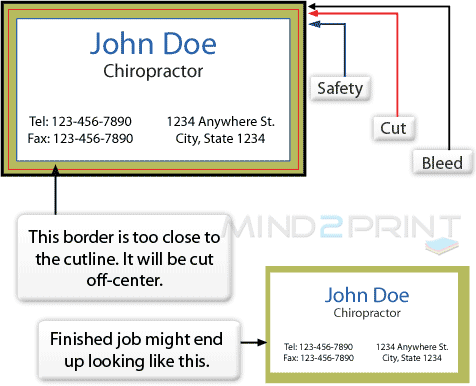 We cut through many sheets at a time, so watch your borders to avoid an unwanted mistake.
[Back To Top]
- How should I set up my file for proper rotation?
Mind2Print requires Print Ready files with proper rotation. Files submitted are printed HEAD to HEAD as-is based off your files. 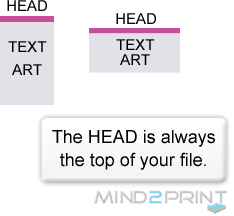 Make sure to set up your files so that when we print them HEAD to HEAD the final product will read the way you would like. Also, front and back files need to be set up either both sides vertically or both sides horizontally.
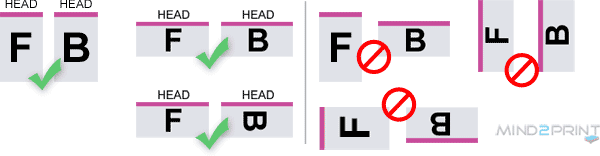
For files not properly set up, Mind2Print will use best judgment and will not be responsible for improper rotation.
[Back To Top]
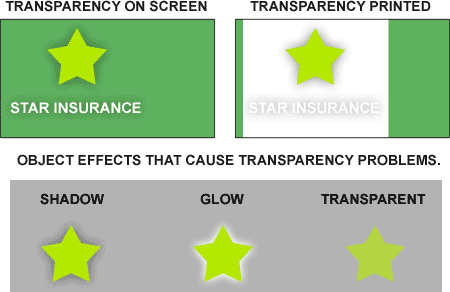
- How can I avoid transparency issues?
Any transparency issue can be resolved before saving your file.We accept files with transparencies for printing. We recommend that you flatten all submitted transparencies in order to avoid any possible problems. If you do not flatten your transparency, we may flatten your transparency for you without contacting you about the format of your submission and advance your job to print. Mind2Print is not responsible for the outcome of your transparency image. Transparencies are caused by shadows, glows and transparent objects created in a vector based platform such as Illustrator and InDesign. If a file containing transparency problems is printed the result will be a white box under the transparent object.
[Back To Top]
- Can I submit multiple files in one document?
No. We are now specifically set up to process one side at a time, and this requires that each side of a job must be on a separate file.
Not separating files will cause delays and you might have to send the files again. Remember to separate the pages of your .pdf files as well. 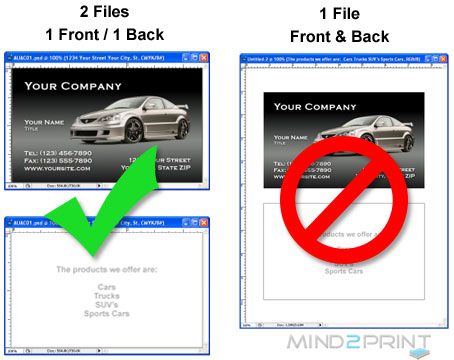
[Back To Top]
- What is rich black and how can I get it?
Rich black is an ink mixture of solid black, 100% K, with additional CMY ink values. This results in a darker tone than black ink alone. If you print black alone as 100% K, the resulting black may not be as dark as you might like.We recommend using 60 M 40 Y 40 K 100
This will give you a deep, dark, rich black. 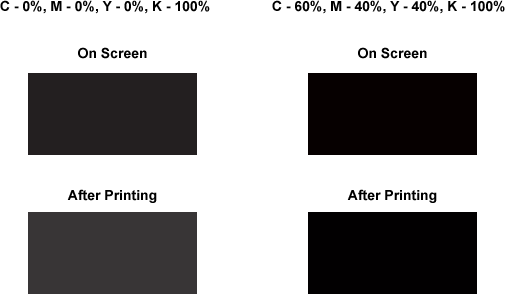
[Back To Top]
- How should I setup my file for Spot UV?
When creating a Spot UV job, you must include a Spot UV template file along with the regular full color file. The Spot UV template file is used to show where the UV will be placed. Use BLACK indicate where you would like the UV. WHITE will indicate no UV. Black should be: C: 0
M: 0
Y: 0
K: 100 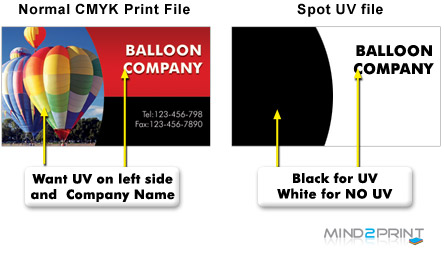
[Back To Top]
- How do I export a PDF correctly?
When exporting from any program such as Indesign or Illustrator, use these settings to make sure your .PDF files export correctly.
EXPORT SETTINGS FOR .PDF FILES 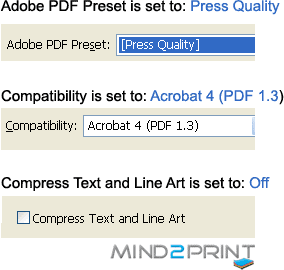
[Back To Top]
- How can I make sure my blues do not come out purple?
When using a blue in your design, always make sure to leave at least a 30% difference in your Cyan and Magenta values.
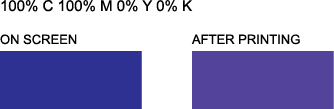
Blue is close to purple in the CMYK spectrum. Remember, use a low amount of magenta whenever using high amounts of cyan to avoid purple.
Example: C-100 M-70 Y-0 k-0
[Back To Top]
- How do I export a grayscale image in a CMYK document?
Grayscale images that are converted to CMYK will have a color shift in the final print. That shift may be green or yellow.
Always check the CMYK values of your grayscale in the final CMYK document. If there are other values other then K in your grayscale image, there is a chance that the color will vary.
To eliminate all values other then K, use your Channel Mixer (adjustment layer) in Photoshop, then click "Monochrome" and adjust accordingly. 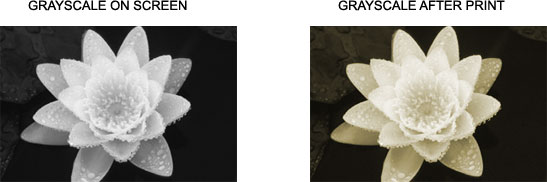
[Back To Top]
|
|
|
|


